Meatball recipe

This is my favourite recipe of meatballs and is a basic recipe that can be modified to your liking. For example, you can add 5 cloves of minced garlic, finely chopped cilantro, paprika powder etc.

img_0120

Ingredients:

1kg minced meat

3 dl milk/water

2 tsp salt

1 ½ dcl bread crumbs

2 eggs

3ml ground black pepper

2-3 onions

Butter to fry in


Instructions:

  1. Preheat the oven to 200 degrees Celsius
  2. Mix the milk/water with the breadcrumbs in a bowl, with the salt and pepper, and leave it to swell.
  3. While the breadcrumbs are swelling, chop the onions finely and fry them in the butter until golden brown. Put them aside to cool.
  4. In a large bowl, combine the minced meat with the onions, the eggs and the breadcrumb mixture. Add more seasoning if necessary.
  5. Scoop up a generous amount of mix with a teaspoon and form meatballs. Put them on a baking tray, with oven paper on it.
  6. Bake them in the oven, in batches, until they’ve got a nice dark brown colour.
  7. The meatballs can be frozen for up to 6 months.
  8. Serve with boiled potatoes, mashed potatoes or pasta

Lasagna boats

Lasagna boats is a recipe that I’ve developed on my own, since I wanted an easier way to eat lasagna and combine it with another food I really enjoy: tacos. Basically you can go either way with this: the usual lasagna or a taco lasagna. The only difference is the seasoning, they’re both cooked and served in stuff n’ stands. This recipe is with meat, but you can easily change the meat for Quorn or any other meat substitute of your choice. Also, I’ve made the cheese sauce from scratch, but you can use canned béchamel sauce or cheese sauce too. If meat is expensive where you live it’s very easy to use a smaller amount and instead use more beans and shredded carrots as a filler. The boats can easily be frozen in containers until you need them and can be frozen at least three months. I can get about 15 lasagna boats from the recipe, depending on how thin I make the Bolognese and cheese sauces.

This recipe is perfect for kids and kids parties too.

Ingredients:


Bolognese sauce:

450 grams minced meat

2 onions

3 cloves of garlic

1-2 cans of baked beans

2 packs of taco seasoning

Thickening

1-2 can(s) of water (use the baked beans can)

1 cube of meat stock

1 tablespoon of soy sauce

Salt, pepper

Butter or oil to fry in


Cheese sauce:

1 litre of milk or cream

Thickening

Butter

300 grams of grated cheese


2 packs of stuff n’ stand

1 pack of lasagna noodles

Grated cheese for decoration


Recipe:

  1. Start preheating the oven to about 200C
  2. Peel and chop the onions finely
  3. Heat a frying pan until very hot and put in the butter.
  4. When the butter has stopped sizzling, put in the chopped onions and cook them until they’ve got a golden colour.
  5. Put in the minced meat and brown it with the onions. Separate and chop up the meat until it’s fine and make sure it’s not pink.
  6. Coat it with the thickening and stir it in
  7. Add the rest of the ingredients for the Bolognese sauce and stir well!
  8. Let it simmer for at least 15 minutes to get the flavours out and then put it aside to cool while you make the cheese sauce.
  9. Melt the butter for the cheese sauce, on a hot stove, and put in the flour or thickening. Stir well, there shouldn’t be any lumps. I always use a whisker when I make the cheese sauce.
  10. Gradually add the milk or cream and mix until it has thickened and then add more until it’s all in there.
  11. Pull the sauce pan from the heat and carefully fold the grated cheese in to the sauce, until it has melted completely.
  12. DO NOT put the cheese sauce back on the stove after you’ve put the cheese in, it’ll make it chewy and stringy.
  13. Put out the stand n’ stuffs on a baking tray and assemble the boats just like you would with regular lasagna
    1. Break up the lasagna noodles and put a few pieces at the bottom, just so it covers it fairly evenly
    2. Put in a thin layer of the Bolognese sauce and then some cheese sauce.
    3. Repeat step A & B until it’s full.
    4. There should be cheese sauce on the top
    5. Add some grated cheese of your choice on top (I recommend parmesan, but whatever you have available is fine).
    6. Repeat this with the rest of the boats
  14. Bake them in the oven for about 30-40 minutes in the lower part of the oven.


Serve on its own or with a light, fresh salad. Enjoy!


How to stay powered up while travelling

Travelling can be very stressful, especially when things go wrong, but with this simple tip you can at least stay connected and powered up!


When you get stuck at an airport or train station for hours on end, with no train or plane in sight, you will get a low battery on your phone/devices and staying connected is important, especially when you’re in a foreign country. If your charger has the same outlet as the country that you’re visiting – go ahead and plug it in – but if you don’t and you don’t have an adapter, then you’re in trouble. It can be surprisingly hard to find an adapter or two, so be sure to have a couple extra ones in your hand luggage.


If you have a connection in a country, on your way to your destination, bring an adapter for that country too – you never know when you’re going to need it. Why? Well, if your flight is late or cancelled from you first airport and you get on a later flight, you will possibly end up spending A LOT of time in the airport of your connecting flight. The flight might only leave once a day, or you’ve missed the last one and will have to spend the night at the new airport/airport hotel. Then you might just need a way to get power in this land too.

UPDATE: Emergency Travel Kit 2

I’ve totally forgotten that I’ve updated my Emergency Kit for my travels and so I’m going to share this update with you. Perhaps you already have these things in your travel kit and if you don’t then I hope you can have some use of my idea. Remember that this is only one way to do this and is only supposed to give you guys a general idea of how you can do it. The possibilities are endless when it comes to putting together an Emergency Travel Kit and should always be varied depending on your needs, the length of your travel, ways of travel & wallet. The only wrong thing to do is NOT bringing a kit with you or not putting any thought behind putting it together – and therefore missing vital things when you open it!

img_3016

This kit is basic food kit that I always bring with me and it contains:

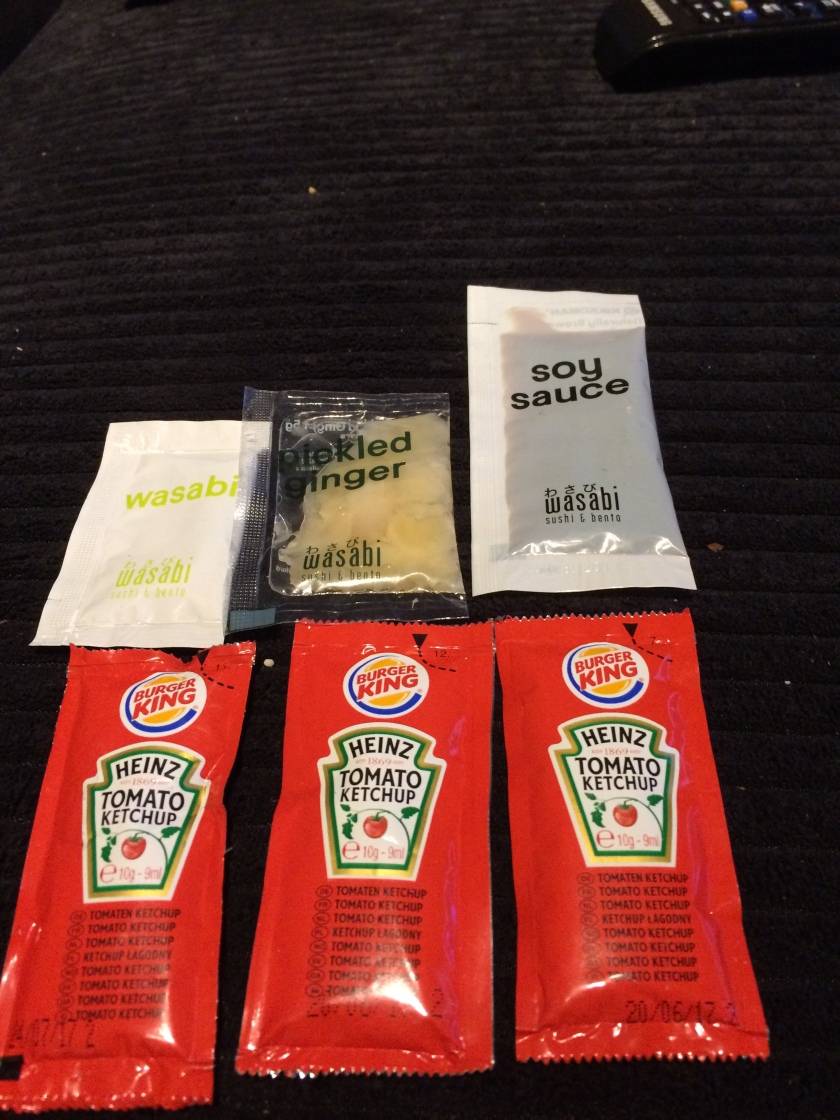
  • A couple of packs of ketchup, mustard & mayonnaise.
  • Small packs of salt & pepper (not in the picture)
  • A pack or two of wasabi, soy sauce and pickled ginger. I absolutely LOVE sushi and so I always have these things. Plus they’re good on a salad if you haven’t bought a dressing.
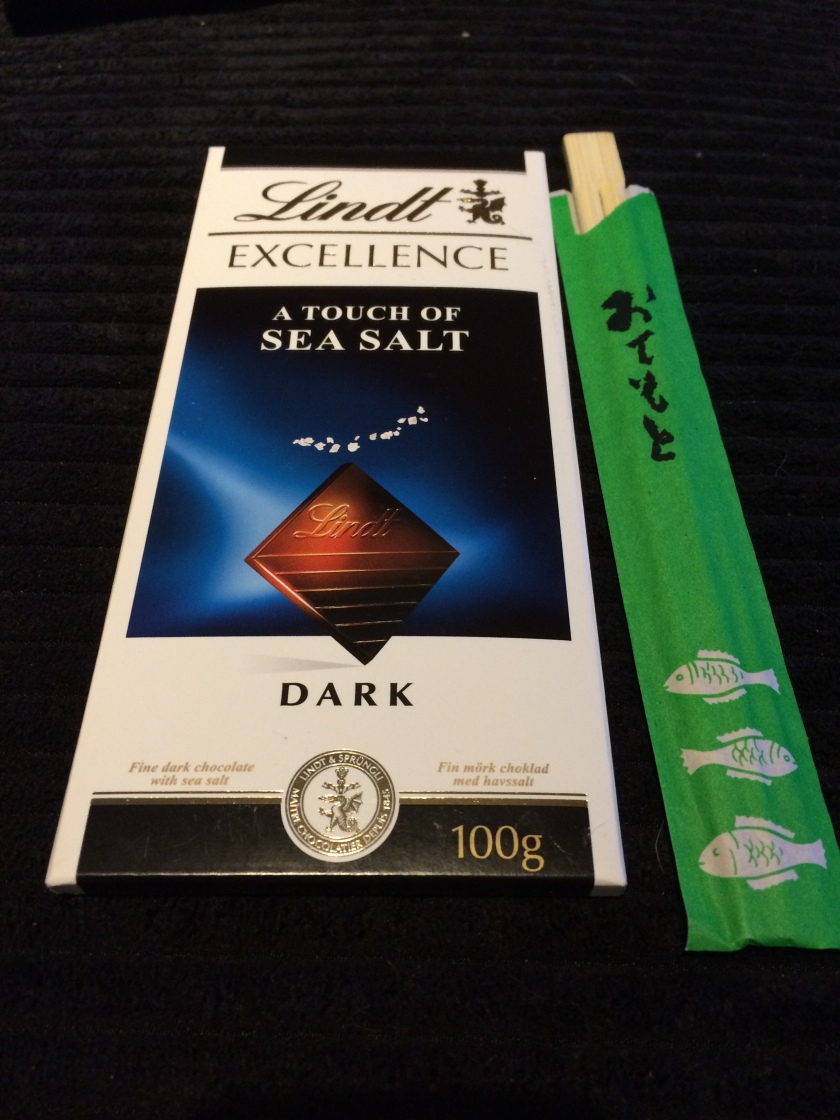
  • Dark chocolate or a bar of candy, just in case I need something to eat while I wait. Sometimes I bring fruit too or a homemade sandwich,
  • Plastic cutlery and/or chop sticks. Usually I bring chop sticks if I’m flying on a plane, since the security officers often take the plastic cutlery away for security reasons.

img_3019


Where do I get all the stuff from and how much does it cost me, you might wonder. Well, most of the things I bring with me are free or near to free. The condiments (ketchup, mustard, salt, pepper etc) are always free – you simply take them from your local McDonalds, Burger King or whatever other fast food place that have them for free. I just take a few extra with me to the table when I’ve ordered and then just put the extra stuff in a ziplock bag, which I then store in my backpack. I always keep them in the fridge just in case.

The wasabi, pickled ginger and soy sauce packs were bought at the chain Wasabi, a chain that sell prepacked sushi, for a few pennies per pack. They last a long time, but be sure to check their expiration date anyway.

The snacks are often the most expensive parts of my food kit, but I always try using coupons and deals to make them as cheap as possible. Dark chocolate is good, raisins, a couple of candy bars, dried fruits, fresh fruits, popcorn etc. I never bring nuts since there are so many that are allergic to them. Remember that there are nuts in Snickers! Snacks are important to keep your energy levels up and if you have an unexpected layover or a long delay – your mood will go down if you’re hungry.

2 half liter bottles of water. It’s very important to stay hydrated on a trip, which is why I bring two bottles of water with me on every trip. If you go an airport, remember to empty them BEFORE the security check or they will be confiscated, and new bottles are expensive. Besides, most airports today have water stations just past the security where you can refill your bottles.

Chop sticks are vital to me, and should be to you. I’ve often been in the situation where I arrive late at night, or on a Sunday, only to find that there are only fast food restaurants, a supermarket or a sushi place open. I go there and buy my food, go back to the hotel room… only to find that I’ve forgotten about cutlery and have nothing to eat with, except for my hands. Not fun. Which is why I always bring chop sticks and since I always forget about utensils, I’ve perfected the craft of eating everything (and boy do I mean EVERYTHING) with a pair of chop sticks.


I hope this post will help you prepare for your next trip and that, if an emergency should arise, you’re as ready as you can be!

Västkustchips sour cream & onion – REVIEW 


I’ve never tried these crisps before and on the whole they were quite nice. This particular brand – Estrella – have three kinds of kettle crisps and this is one. 

The crisps are very light and doesn’t have as much grease & flavoring coming off on your fingers as other brands I’ve tried. The bags are only 180 grams, a nice bag size for 1-2 persons watching a  film, but if you’re 3 or more you need at least one more. On the negative side, they didn’t taste as much as I would have liked. You can taste the onion, but the sour cream doesn’t come out. I would have liked them better if they had more sour cream and a pinch more salt. 

So, on the whole: nice, but a bit bland.

If you’re allergic to PEANUTS: beware!!! They cook the crisps in peanut oil!

Minced meat risotto

I’ve just come up with a new recipe that I want to share with you guys. It’s a risotto made with minced meat, but you can easily make it vegetarian or vegan by swapping out the meat with Quorn or tofu. Also, use vegetable stock instead of meat stock and olive oil instead of butter.

This recipe is really easy to make, it becomes a good many portions, is cheap and tasty.
Ingredients:

150gr peas

450gr minced meat 

1 red bell pepper

1 medium onion

2-3 cloves of garlic

1 cube of meat stock

3dl rice 

7dl water

Parsley 

Salt and pepper 

Butter to fry in
Instructions:

1. Put the water in a pot, along with the meat stock cube, and bring to a boil.

2. Cook the rice according to the package.

3. Meanwhile, dice the onion and bell pepper finely. Put them in separate bowls.

4. Heat up a frying pam, melt some butter and put in the onion. Also press in the cloves of garlic. Fry until golden brown.

5. Put in the meat and brown it. Be sure to chop it up into fine pieces.

6. Mix in the rice, parsley, and red bell pepper and att a couple of tablespoons of water. Let it cook/simmer for a couple of minutes.

7. Salt and pepper to taste.